Monday, July 06, 2015

Fluffy No-Bake Peanut Butter Pie

Fluffy No Bake Peanut Butter Pie from fact Womand and Buttercream Lane

This is the perfect dessert to make when it's too hot to turn on the oven or even a burner. We love to go to a very small town cafe about a half an hour away for their pan fried chicken, cooked to order, and their homemade pies. 

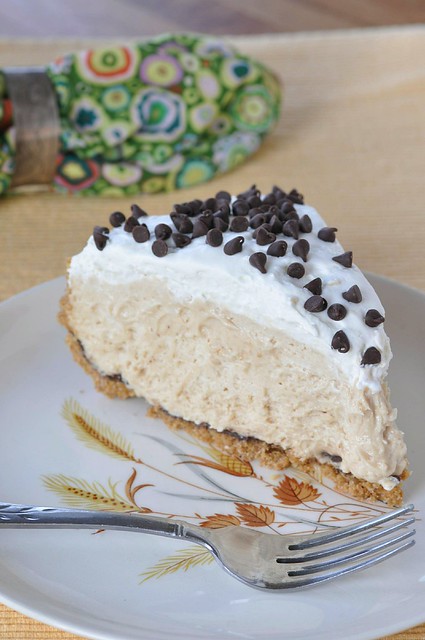
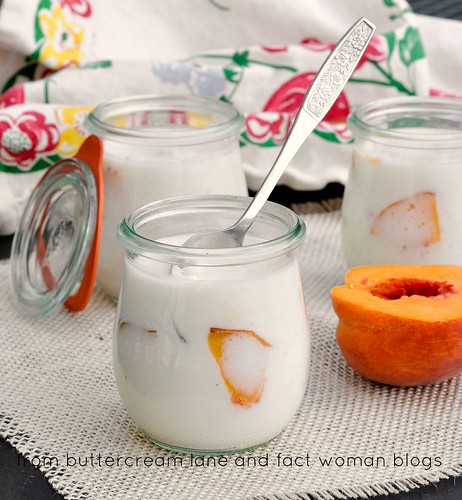
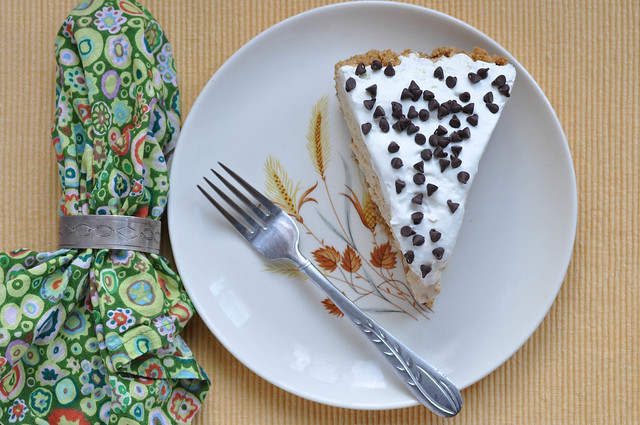
The Castle Cafe always has a killer banana cream pie but every few months the chef will get in a mood to make a Chocolate Peanut Butter Pie that is one of the best things I've ever had and I'm not even a big peanut butter person. Note the "only every few months" part of that- it's not nearly often enough so, I had to play with some recipes to come up with one that tastes just like his!!! We all agree that this is a perfect copy!

One of the secrets to his great pies is his chocolate coated graham cracker crusts. He uses it for his Banana Cream Pie and his Peanut Butter Pie. Brilliant! The crust never get's soggy!!  I hope you enjoy this pie as much as we do!


For a Printable Version of this recipe- Click Here! 

Ingredients

Pie Crust- Makes one 9" pie crust- You can also just buy one!!! 

  • 1 package from a box of graham crackers- about 10 sheets of crackers
  • 1/3 cup of sugar
  • 1/3 cup of melted butter
  • 3/4 of a cup of chocolate chips

Peanut Butter Filling

  • 1 1/2  8oz packages of low fat cream cheese at room temperature(12 oz)
  • 1 1/2 cups of creamy peanut butter- store bought not the fresh kind. I like Jif
  • 3 TBS of water or milk
  • 1 1/2  cup of powdered sugar- divided into 1 cup and 1/2 cup
  • 1 1/2 cups of heavy whipping cream
  • 1/2 cup of chocolate chips- Optional- you can mix some into the filling or you can just top the pie with some or both. 

Topping

  • 1/2 cup whipping cream
  • 1/4 cup powdered sugar
  • 1/2 cup of mini chocolate chips- Optional
Peanut Butter Pie from Fact Woman & Buttercream Lane

Instructions 

Pie Crust

  1. Preheat your oven to 375ยบ
  2. While the crackers are still wrapped, press of the sides, top and bottom to start to break them up. 
  3. Place the crackers into a food processor. You can also put everything into a large zip lock bag and crush and mix the ingredients in the bag. 
  4. Add the sugar
  5. Pulse until the crackers are a fine crumb
  6. Pour the melted butter over the crumbs and pulse until all combined. 
  7. Press the crumbs into the bottom of a 9" pie plate. I use a measuring cup to press it in nice and tightly. 
  8. Bake for 7 minutes
  9. As soon as you take the crust out of the oven, sprinkle the chocolate chips over the bottom of the crust. 
  10. Let it sit for 5 minutes until the chocolate chips are melted. 
  11. With the back of a spoon, spread the melted chocolate over the bottom and up the sides of the crust. 
  12. Place in the refrigerator until cool 

Peanut Butter Filling

  1. In a  mixing bowl, beat the whipped cream with 1/2 cup of the powdered sugar until it forms stiff peaks. That means when the beaters are pulled up out of the whipped cream, the points stand up straight. 
  2. In another mixing bowl, place your 12 oz of softened cream cheese, the 1 1/2 cups of peanut butter, 1 cup of powdered sugar and 3 TBS of water. Beat until well combined and slightly fluffy. 

  3. Take 1/3 of the whipped cream and stir it into the peanut butter mixture to lighten it. 
  4. Take the remaining whipped cream and fold it into the peanut butter mixture and fold until all combined. 
  5. Spoon the peanut butter filling into the chilled crust and place in the fridge for at least 2 hours. 

Topping:

  1. In a  mixing bowl, beat the whipped cream with 1/2 cup of the powdered sugar until it forms stiff peaks. That means when the beaters are pulled up out of the whipped cream, the points stand up straight. 
  2. Spread the whipped cream over the top of the pie and sprinkle on the  mini chocolate chips. 
  Note: You can beat all 2 cups of whipped cream and the 3/4 cup of powdered sugar together- just remember to pull out a quarter of it to top the pie with before mixing the whipped cream into the peanut butter mixture. It's up to you! I tend to forget the pull out the topping so I beat the cream in separate batches! 
Peanut Butter Pie from Fact Woman & Buttercream Lane

Friday, July 03, 2015

Easy, Moist Shortcake or Vanilla Cake for Berries- made all in one bowl!!! An Egg Free Cake!

Strawberry Shortcake from Fact Woman & Buttercream Lane
 I'm not a fan of the dry, crumbly, biscuit style of shortcake. I want a moist tender cake for my berries.  Tender and moist but can stand up to the weight of a ton of berries and whipped cream.

16 years ago, we ordered the strawberry shortcake at a restaurant that sounds like The Black Eyed "Bee" and I was in heaven. It was the perfect cake for berries. I had to have the recipe and with a bit of flattery and begging, the chef shared the recipe with me. The one catch was, he had to leave one ingredient out to give it to me. Thankfully, he made it easy when he told me that it was a vanilla cake and guess what ingredient was missing?
We always have this on Easter to usher in berry season and is one of our favorite spring and summer treats.  It's so fast and easy to mix up and bake. I hope you enjoy it as much as we do. It's delicious with any kind of summer fruit. peaches, berries or just by itself with some whipped cream as the icing. Because my granddaughter is very allergic to eggs, this eggless cake has now become her birthday cake recipe.
Moist Vanilla Strawberry Shortcake

DSC_9473.jpg
Makes one 9x13 pan or 12 cupcakes or one jellyroll pan
Ingredients
  • 3 cups of flour
  • 2 cups of sugar
  • 1 1/2 TBS baking powder
  • 1 cup melted butter
  • 2 cups milk
  • 1 1/2 tsp vanilla

Instructions
  1. Preheat oven to 350°
  2. In a 2 cup glass measuring cup or a microwavable container- microwave 1 cup of butter for 60 seconds or until melted. I leave the sticks in the wax paper and micriwave it that way. No spatters and you just have to pull them out when it's melted. Easy and no mess. 
  3. In a large bowl stir together the flour, sugar and baking powder
  4. Stir in the milk and vanilla then the melted butter and mix well. There may be a few small lumps but just leave them. Don't over stir! 
  5. Pour batter into a greased pan and bake in the preheated oven until golden on top and a toothpick comes out clean. 
  6. Baking Times: 
    1. For a 9x13 or cupcakes-  25 to 30 minutes  
    2. For jelly roll pan- or 20 mins f. 
    Strawberry Shortcake from Fact Woman & Buttercream Lane
For a large half sheet pan 2”x13”x18”- Double the recipe and bake for 40 to 45 minutes. 

Wednesday, July 01, 2015

Greek Yogurt Panna Cotta Made with Almond Coconut Milk and Peaches. Gluten Free and Lactose Friendly

Greek Yogurt Panna Cotta with Fresh Peaches that's Gluten Free from Buttercream Lane and Fact Woman
Panna Cotta is one of those desserts that sounds much harder to make than it is. Once I discovered how easy it was to make, I make it often. It only takes about 4-5 minutes to whip together and then an hour or so to chill. I came up with this recipe when I wanted something a little different that I could make for a dessert but also eat for breakfast and not feel guilty! I used a combination of Nonfat Greek yogurt and almond coconut milk as the base. It turned out thick and rich and delicious and guilt free. Because it uses Greek yogurt and almond milk it doesn't bother my lactose sensitive stomach at all. If you're lactose sensitive and yogurt doesn't bother you then you'll love this even more! 

I feel so blessed to live in Colorado, especially during the summer peach season.  The peaches here are the kind of peaches that when you cut or bite into them, the juice just flows out and the perfumed scent fills the room. They are so sweet and so delicious! Just writing about them is making me want to go cut another one but I have to pace myself I decided to chop some up to put into this Panna Cotta and I was not disappointed. If you don't like peaches you can use almost any fruit except fresh pineapple or fresh papaya- their enzymes will prevent the mix from setting up. Strawberries, blueberries and raspberries are amazing! 


Greek Yogurt Panna Cotta with Fresh Peaches from Buttercream Lane and Fact Woman

You can make it in small jars like I did and just eat it out of the jar, or you can make it in small ramekins that you can un-mold onto a plate. You can also make it in a regular 8-9" round cake pan and un-mold that onto a large plate to serve. I just like eating it out of my cute Weck jars plus I didn't feel like un-molding anything!  If you want to un-mold it- Lightly grease the inside of your pans/ ramekins so that the panna cotta will come out easier. I also get a bowl of hot water and hold the mold in the water for a few seconds to loosen it before un-molding.

 Greek Yogurt Panna Cotta  Makes 5-6  medium servings

 Ingredients:

  • 1 envelope of unflavored gelatin 
  • 1 cup of Almond or Coconut or  The Blue Diamond Almond Coconut Milk. (you can use unsweetened or sweetened it doesn't matter. but if you use sweetened, you might cut back on the agave or sugar a bit) 
  • 1/4 cup agave syrup or honey or 1/3 cup sugar to taste
  • 1- 17 oz container of Plain Greek Yogurt- nonfat, 1 %, whole milk- doesn't matter
  • 1 tsp vanilla- optional
  • 2 large or 3 medium peaches chopped- About a cup to a cup and a half depending on how much fruit you want in each. You can also use strawberries, blueberries, blackberries or apricots. Any fruit but fresh Pineapple or papaya- they have enzymes in them that will prevent the gelatin from setting up so you'll end up with a yogurt and fruit drink! 

Instructions:


  1. Take a 1/4 cup of the almond milk  in a small bowl and sprinkle the gelatin over the top. Let sit 1-2 minutes while you get the rest of the ingredients together and chop up the peach. 
    1. Greek Yogurt Panne Cotta from Buttercream Lane and Fact Woman Blogs
  2. Add the yogurt  and 1/4 of the almond milk to a small bowl- (preferably one with a spout to pour out of) and whisk together until smooth. 
  3. Take 1/2 cup of the almond milk and the sweetener and place in a small saucepan 
  4. Over Medium heat, heat the milk and sweetener until mixed together and all dissolved. 
  5. Add the softened gelatin to the pan and stir until the gelatin is dissolved. You don't have to bring it to a boil. Heat just until everything is dissolved. 
  6. Remove from the heat and pour the warm mixture into the yogurt.
  7. Add the vanilla to  it if you wish. I think real vanilla tastes like plastic and the fake stuff is worse!
  8. Pour the mixture into your containers- filling 1/2 way. 
  9. If you are adding fruit, add the chopped fruit and push the fruit down into the yogurt mixture with a spoon. Then top with the remaining yogurt mixture  so that the fruit is covered. 
  10.  Greek Yogurt Panne Cotta from Buttercream Lane and Fact Woman Blogs Greek Yogurt Panne Cotta from Buttercream Lane and Fact Woman  Greek Yogurt Panne Cotta from Buttercream Lane and Fact Woman Blogs
  11. Chill for 1-3 hours depending on the shape of your container. a thinner layer will chill in an hour. A 5 oz jar will take closer to 3 hours. 
                               Greek Yogurt Panne Cotta from Buttercream Lane and Fact Woman
    The panna cotta  will still jiggle a bit but not be  set up. Think a little less gigglier than jello. It's really a softer jello consistency. 

    Greek Yogurt Panna Cotta with Fresh Peaches from Buttercream Lane and Fact Woman

    Blogging tips