Monday, October 29, 2012

Oatmeal Island Cookies

Island Cookies
Island Cookies

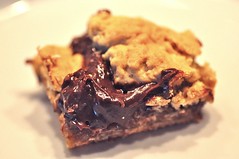
With a tender oatmeal crust, fudge filling and more of the oatmeal dough scattered like islands over the top, these are rich, chewy,delicious and hands down my kids' favorite cookie/bar!

Preheat oven to 350 degrees
Grease or line a 9x13 pan with parchment. I like using parchment because it makes it much easier to cut. You just lift the whole thing out to cut into small pieces.

For Dough: In a large mixing bowl cream together:
  • 1 Cup Butter
  • 1 Cup Brown Sugar
  • 1 Cup White Sugar
 Beat in
  • 2 Eggs and
  • 2 tsp Vanilla
Then add:
  • 2 ½ Cups of flour
  • 1 tsp baking soda
  • 1 tsp salt
  • 3 Cups Oatmeal
Untitled
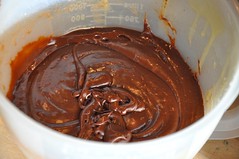
Filling: Pour the following ingredients into a microwave safe bowl
  • 12 oz of chocolate chips
  • 2 TBS of butter
  • 1-12 oz can of sweetened condensed milk
  • ½ tsp salt
  • 2 tsp vanilla
Microwave on high heat for 30 seconds remove and stir. Microwave for 15 seconds and stir, repeat at 15 second increments until filling is all melted and smooth.
Untitled


Putting cookies together:
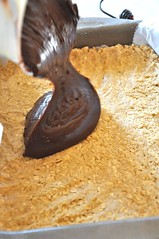
  • Press 2/3 of dough into the bottom of a greased or parchment lined 9x13” pan until even. 
  • Pour the chocolate filling over the dough. 
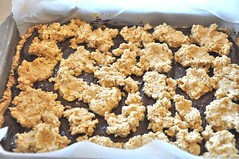
  • Dot with the remaining 1/3 of dough.
    Untitled
Bake at 350 degrees for 25-30 minutes until the cookie part is a medium golden brown.
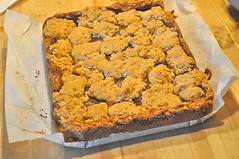
Remove from oven and let cool before cutting into very small squares.

Untitled
They're quite rich.
These freeze very well. 

Friday, October 26, 2012

Fluffy Pumpkin Pancakes

Pumpkin Pancakes with Cinnamon Syrup from Butercream Lane Blog 


In the fall there are two things I crave, pumpkin and cinnamon. This recipe combines them both deliciously.  I doctored up my regular pancake recipe, which has been in my family for generations, with pumpkin and spices to make these nice light fluffy pancakes. There's nothing worse than a heavy dense pancake! I highly recommend serving it with our Cinnamon Syrup Recipe!


  • 2 cups of all- purpose flour
  • 1/3 cup brown sugar
  • 2 tsp baking powder
  • 1 tsp baking soda
  • 1 tsp ground cinnamon
  • 1/2 tsp ground ginger
  • 1/4 tsp ground cloves
  • 1/2 tsp of salt
  • 1 1/2 cups of milk
  • 1 egg 
  • 1 cup of pumpkin- I prefer Libby's Pumpkin (not the pumpkin pie filling)
  • 2 TBS vegetable oil or melted butter
  1. Sift together the flour, sugar, baking powder, baking soda, spices and salt.  
  2. In a separate bowl beat together the milk, egg, pumpkin and the oil or butter until well combined. 
  3. Add the dry ingredients to the wet and stir until just combined. Don't over stir!!!!
  4. Cook on a lightly greased griddle or frying pan and serve.

Thursday, October 25, 2012

Cinnamon Syrup or LollyKaDope


This syrup is delicious on pancakes, as a dip for apples, over apple pie, spice cake, pound cake, ice cream or just about anything you want a sweet cinnamony taste on. It's especially good on our Pumpkin Pancakes! You can also add other spices in with the cinnamon. I sometimes will add some nutmeg or some orange zest for a different flavor. Here's the base recipe for you to play with. 

Cinnamon Syrup or Lollykadope or,
as my kids call it, Pancake Gravy

Pumpkin Pancakes with Cinnamon Syrup from Butercream Lane BlogClick Here for a Printable version of this recipe
  • 1 cup white sugar
  • 1 cup brown sugar
  • 3/4 cup corn syrup- deal with it, it's just another sugar, everything in moderation
  • 2 1/2 tsp ground cinnamon
  • 1/2 cup water
  • 3 TBS butter
  • 10 oz of evaporated milk- You can use low fat!
  • 1 tsp vanilla (optional)


  1. in a large non stick pan- Large is a key word here. Unless you LOVE cleaning up boiled sticky sugar from your stove, the pan needs to be a really big sauce pan or better yet a stockpot because it has a tendency to boil over and we all know how much fun that is to clean up. Stir the white and brown sugars together with the cinnamon. 
  2. Add the corn syrup and water and stir to a paste. 
  3.  Turn the heat onto Medium High
  4. Add the butter
  5. Bring to a full boil over medium-high heat.
  6. Boil for 2 to 3 minutes.
  7. Remove from heat and let cool for 5 to 10 minutes. I will sometimes boil the sugars, water and butter the night before, leave it covered on the stove so that in the morning all I have to do is warm it back up until it starts to steam- Don't bring to a boil as you reheat or you'll have to let it cool off again. If it's too warm it will curdle the milk and you'll have lumpy gravy. It still tastes fine it just doesn't look as good. I actually do this on a regular basis because I'm too impatient to wait for it to cool and I'm fine if it's not perfectly smooth!
  8. Once it's cooled off some, add the condensed milk and the vanilla.If the syrup is too thick, add a bit more milk to it if necessary.
  9. Stir until combined and serve warm over pancakes.
This will keep well in the fridge for a couple of weeks so make a double batch and just heat and serve whenever you need it.

Tuesday, October 23, 2012

"The Cookbook"


I need to talk about "The Cookbook". We have a few family recipes. Every family does. I've seen some family cookbooks that are several recipes bound together, or even little boxes of recipe cards. Here's what my gals are bringing to the table...


 That's a four inch binder people. I, Laura, am a culinary school trained pastry cook, but my mom, Margaret, is a better cook and baker than me. My grandma, Hope, may be better than her (although it's too close to call). And my great-grandma, Clara, is still canning fruits and vegetables from her backyard garden and orchard and making candy at age 93. I'm sure some of the recipes in here are well over 100 years old.

Along the way it has been added to by my great-grandma, my grandma, my mom, and even my dad's mom has gotten a few into Grandma Hope's master cookbook. I went out to Maine for a visit one summer during college, and I came home with my very own copy of "The Book". It was a really exciting day. My grandma found that vegetable fabric and saved it to make my binder pretty, and she even put dividers in to separate the different categories. Thanks, grandma!

Monday, October 01, 2012

Pumpkin Spiced Whoopie Pies with Maple Mascarpone Filling

There's something about this time of year that makes me long for warm, cozy, down home foods and pumpkin to me is one of these foods.

Pumpkin Spiced Whoopie Pies with Maple Mascarpone Filling from Fact Woman blog
I was feeling like some fall food so jumped onto Pinterest and found lots of delicious pumpkin recipes. When I saw a couple of recipes for pumpkin whoopie pies, I knew I found what i wanted to make/eat!  The problem I ran into was the recipes either used vegetable oil or a cake mix or both and I didn't want to go there. If I'm going to eat fat, it's going to be butter. Butter just tastes better and makes anything it's in or on taste better too and if I'm going to bake, I want to do it from scratch. It only takes about 5 minutes longer to measure some ingredients and the final result just tastes so much better..

After reading through different recipes for pumpkin whoopies, I found a few that sounded kind of good, but not quite right. I combined the best of those recipes with a recipe I have for a soft molasses cookies and the Libby Pumpkin Pie recipe and came up with this one. It's a perfect spiced pumpkin cake like cookie with a creamy, buttery, slightly maple flavored filling. I served it to company, family company so they'd be honest, and they were a hit. I hope you enjoy them as much as we all did.

Pumpkin Spiced Whoopie Pies with Maple Mascarpone Filling from Fact Woman

Pumpkin Spiced Whoopie Pies with Maple Mascarpone Filling
Click here for a Printable version of this recipe.

Whoopie Pies
3 cups all purpose flour
1 TBS cinnamon
1 ½ tsp ground ginger
1 tsp baking powder
1 tsp baking soda
1 tsp salt
½ tsp ground nutmeg
¼ tsp ground cloves

1 cup softened butter
1 1/2 cup brown sugar
2 eggs
3 TBS of molasses
1-15oz can of Libby's Pumpkin chilled- I just throw the can in the fridge for a few hours.(this chills up the dough so you can scoop and bake right away. If you don't want to chill the pumpkin, then chill the finished dough for a couple of hours before scooping it to bake.
1 tsp vanilla

Maple Filling
4 cups powdered sugar
8 oz of mascarpone cheese room temperature
1 stick of butter softened
3 TBS of Maple Syrup or (¼ cup of Maple Sugar plus 3 TBS milk)

The Whoopie part:
  1. Preheat oven to 350° F. Line baking sheets with parchment paper
  2. In a small bowl whisk together the dry ingredients- flour, spices, baking powder, baking soda, salt
  3. In a large mixing bowl, cream together the butter, sugars until combined and fluffy. Add the eggs one at a time and beat to combine. Add pumpkin and vanilla and beat until combined.
  4. Add in the dry ingredients and mix just until combined. Do not over beat.
  5. Using a small cookie scoop or a tablespoon, drop batter onto the parchment lined sheets about 1 inch apart.
  6. Bake for 10-12 minutes making sure that the cookies are cooked through. They will start to crack on the top- it’s part of their charm!  I used a toothpick inserted in to the center to make sure they were done.
  7. Slide parchment off of sheets and onto counter to cool.

Filling
  1. Beat the butter and marscapone cheese until fluffy and smooth- this will take  3-5 minutes. Add half the powdered sugar then the maple syrup (or the maple sugar and milk) and the vanilla. Beat until combined. Then continue adding the rest of the powdered sugar until it is thick enough to hold it's shape well.

Assembly
Match up the cookies into sets of 2 similar size and shape and turn one over.  Spoon or pipe the filling onto the upside down cookies covering the entire surface. I spoon all the filling into a quart size zip lock bag and cut one corner off , then all I have to do it squeeze it out to pipe it.
Place the other cookie on top of the filling and press down slightly to get the filling all the way out to the edge. Repeat for each whoopie pie. 

Storage 
Please store these in the refrigerator. You can store these for up to a week in the refrigerator. Take out and let sit at room temperature for about 15-20 mins before serving to soften up or just eat them cold.
Blogging tips