Friday, September 27, 2013

An Easy and Delicious Paleo, Gluten Free, Dairy Free, Chocolate Mousse Recipes, made from Coconut Milk, Cocoa Powder and Bananas

3 Easy and Delicious Paleo, Gluten Free, Dairy Free, Chocolate Mousse Recipes from Buttercream Lane and Fact Woman


Paleo Mousse Week- Mousse #3- uses cocoa powder and frozen bananas! 

Photographer Friends of ours came to visit last week and they eat a paleo diet so I came up with these recipes to share with them.  Take a minute and check out her wonderful photos and if you're getting married you really need to see them!!!! They travel all over to shoot weddings!

See Mousse #1 Here!
See Mousse #2 Here!

Makes about 4-6 servings

Ingredients

  • 1- 14 oz can of full fat Coconut Milk- Chilled in refrigerator for at least 12 hours
  • 1/4 cup cocoa powder- sifted
  • 2 bananas cut into chunks and frozen solid
  • Optional 1/2 tsp vanilla extract ( I think real vanilla extract tastes like plastic so I skip it)
  • Optional 1/2 tsp ground cinnamon- I love cinnamon and chocolate!

Instructions

  1. Place unopened can of full fat Coconut Milk into the refrigerator and chill for at least 12 hours.  (Hint- shake the cans when you buy it and try to pick a can that is thicker and doesn't slosh around as much when you shake it)
  2. Peel and cut up 2 bananas into chunks and freeze for 12 hours. 
  3. Open the can of coconut milk and slowly pour into a blender. Try to keep some (2-4 TBS) of the thin liquid in the bottom of the can and don't pour that part into the bowl- save it for later. 
  4. Add the cocoa powder and banana chunks in with the chilled coconut milk.
  5. On high speed blend the ingredients until smooth and fluffy. If it's too thick use some of the coconut milk you saved in the can to make it a bit thinner. 
  6. Serve right away. You can keep in refrigerator or you can freeze and serve like ice cream later!!!

Wednesday, September 25, 2013

An Easy and Delicious Paleo, Gluten Free, Dairy Free, Chocolate Mousse Recipes, made from Coconut Milk and Cocoa Powder

Paleo Chocolate Mousse  Week Recipe #2 uses Coconut Milk and Cocoa Powder.

3 Easy and Delicious Paleo, Gluten Free, Dairy Free, Chocolate Mousse Recipes from Buttercream Lane and Fact Woman
See the first recipe in this series by clicking (here)3 Easy and Delicious Paleo, Gluten Free, Dairy Free, Chocolate Mousse Recipes from Buttercream Lane and Fact Woman

Mousse #2- using cocoa powder

Makes about 4-6 servings

Ingredients

  • 1- 14 oz can of full fat Coconut Milk- Chilled in refrigerator for at least 12 hours
  • 1/4 cup cocoa powder- sifted
  • 3 TBS of honey or maple syrup or the sweetener of your choice, you can add an extra TBS if you want it sweeter
  • Optional 1/2 tsp vanilla extract ( I think real vanilla extract tastes like plastic so I skip it)
  • Optional 1/2 tsp ground cinnamon- I love cinnamon and chocolate!
  • Optional but delicious- 2 TBS of any nut butter. (I made the mousse, took half  and mixed in 1 TBS of almond butter but a hazelnut butter would be great too.) It worked great with and without the nut butter so add if you want and leave it out if you want! Up to you!!

Instructions

  1. Place unopened can of full fat Coconut Milk into the refrigerator and chill for at least 12 hours.  (Hint- shake the cans when you buy it and try to pick a can that is thicker and doesn't slosh around as much when you shake it)
  2. Open the can of coconut milk and slowly pour into a mixing bowl. Try to keep some (2-4 TBS) of the thin liquid in the bottom of the can and don't pour that part into the bowl. 
  3. Add the cocoa powder and sweetener to the bowl with the chilled coconut milk.
  4. On high speed with a hand mixer or a regular mixer- beat the cold coconut milk mixture until stiff peaks form. When you pull the beater out the peaks of the whipped coconut milk will stand up straight. 
  5. Chill, covered,  in the fridge for at least an hour or up to a day ahead of serving. I made it yesterday and it was perfect tonight. You can chill all together or you can spoon into your serving dishes and chill that way.  
This is VERY rich so servings should be about 1/3- 1/2 cup per serving.

Thanks to our talented Paleo eating friends , Carly and George who came to visit and inspired me to make these recipes. Take a minute and see her amazing wedding photography by clicking here! 

Monday, September 23, 2013

An Easy and Delicious Paleo, Gluten Free, Dairy Free, Chocolate Mousse Recipes, made from Coconut Milk and Dark Chocolate


This week I will be sharing 3 very easy and delicious paleo, gluten free, 
dairy free chocolate mousse recipes!
They each take just a few minutes to make (once the coconut milk is chilled) and an hour or so to chill. They're a guilt free treat. 
Easy Paleo Chocolate Mousse from Buttercream Lane and Fact Woman3 Easy and Delicious Paleo, Gluten Free, Dairy Free, Chocolate Mousse Recipes from Buttercream Lane and Fact Woman

We had a wonderful couple come stay with us last week. Carly was actually the photographer for my son and daughter-in-law's wedding!;
(here are more wedding photos)
and we've become good friends with her and her husband, George. 

(Check out her amazing photos here
.) They came here to shoot 2 weddings  in Colorado and to visit.  Since they're on a paleo diet, I did some research and came up with some recipes to use while they were here.                                                                        
We ended up not having these desserts but I wanted to try making a dairy free chocolate mousse for myself, since dairy is not my friend!!! I made it 3 different ways and they are all delicious. Make sure to come back this week for the other 2!


3 Easy and Delicious Paleo, Gluten Free, Dairy Free, Chocolate Mousse Recipes from Buttercream Lane and Fact Woman

Mousse #1- uses dark chocolate

Makes about 4-6 servings

Ingredients

  • 1- 14 oz can of full fat Coconut Milk- Chilled in refrigerator for at least 12 hours
  • 6 oz of dark chocolate, melted
  • Optional 1/2 tsp vanilla extract ( I think real vanilla extract tastes like plastic so I skip it)
  • Optional 1/2 tsp ground cinnamon- I love cinnamon and chocolate!

Instructions

  1. Place unopened can of full fat Coconut Milk into the refrigerator and chill for at least 12 hours. 
  2. Melt the 6 oz of chocolate and stir until smooth. Let chocolate cool slightly
  3. Open the can of coconut milk and slowly pour into a mixing bowl. Try to keep some (2-4 TBS) of the thin liquid in the bottom of the can and don't pour that part into the bowl. 
  4. On high speed with a hand mixer or a regular mixer- beat the cold coconut milk until stiff peaks form. When you pull the beater out the peaks of the whipped coconut milk will stand up straight. 
  5. While still beating, pour the melted chocolate into the bowl and beat until combined. 
  6. Chill in the fridge for at least an hour. You can chill all together or you can spoon into your serving dishes and chill that way.  
This is VERY rich so servings should be about 1/3- 1/2 cup per serving. 

Come back on Wednesday for the next recipe!

Wednesday, September 11, 2013

Cinnamon Spiced Pumpkin Whoopie Pies with Maple Cinnamon Mascarpone Filling

There's something about this time of year that makes me long for warm, cozy, down home foods and pumpkin to me is one of these foods.
Cinnamon Spiced Pumpkin Whoopie Pies with Maple Cinnamon Mascarpone Filling by Fact Woman and Buttercream Lane Blogs
I was feeling like some fall food so jumped onto Pinterest and found lots of delicious pumpkin recipes. When I saw a couple of recipes for pumpkin whoopie pies, I knew I found what i wanted to make/eat!  The problem I ran into was the recipes either used vegetable oil or a cake mix or both and I didn't want to go there. If I'm going to eat fat, it's going to be butter. Butter just tastes better and makes anything it's in or on taste better too and if I'm going to bake, I want to do it from scratch. It only takes about 5 minutes longer to measure some ingredients and the final result just tastes so much better..

After reading through different recipes for pumpkin whoopies, I found a few that sounded kind of good, but not quite right. I combined the best of those recipes with a recipe I have for a soft molasses cookies and the Libby Pumpkin Pie recipe and came up with this one. It's a perfect spiced pumpkin cake like cookie with a creamy, buttery, slightly maple flavored filling. I served it to company, family company so they'd be honest, and they were a hit. I hope you enjoy them as much as we all did.

Pumpkin Spiced Whoopie Pies with Maple Mascarpone Filling from Fact Woman

Spiced Pumpkin Whoopie Pies with Maple Cinnamon Mascarpone Filling
Click here for a Printable version of this recipe.

Whoopie Pies
3 cups all purpose flour
1 TBS cinnamon
1 ½ tsp ground ginger
1 tsp baking powder
1 tsp baking soda
1 tsp salt
½ tsp ground nutmeg
¼ tsp ground cloves

1 cup softened butter
1 1/2 cup brown sugar
2 eggs
3 TBS of molasses
1-15oz can of Libby's Pumpkin chilled- I just throw the can in the fridge for a few hours.(this chills up the dough so you can scoop and bake right away. If you don't want to chill the pumpkin, then chill the finished dough for a couple of hours before scooping it to bake.
1 tsp vanilla

Maple Cinnamon Filling
4 cups powdered sugar
8 oz of mascarpone cheese room temperature
1 tsp ground cinnamon
1 stick of butter softened
3 TBS of Maple Syrup or (¼ cup of Maple Sugar plus 3 TBS milk)

The Whoopie part:
  1. Preheat oven to 350° F. Line baking sheets with parchment paper
  2. In a small bowl whisk together the dry ingredients- flour, spices, baking powder, baking soda, salt
  3. In a large mixing bowl, cream together the butter, sugars until combined and fluffy. Add the eggs one at a time and beat to combine. Add pumpkin and vanilla and beat until combined.
  4. Add in the dry ingredients and mix just until combined. Do not over beat.
  5. Using a small cookie scoop or a tablespoon, drop batter onto the parchment lined sheets about 1 inch apart.
  6. Bake for 10-12 minutes making sure that the cookies are cooked through. They will start to crack on the top- it’s part of their charm!  I used a toothpick inserted in to the center to make sure they were done.
  7. Slide parchment off of sheets and onto counter to cool.

Filling
  1. Beat the butter and marscapone cheese until fluffy and smooth- this will take  3-5 minutes. Add  the cinnamon and half the powdered sugar then the maple syrup (or the maple sugar and milk) and the vanilla. Beat until combined. Then continue adding the rest of the powdered sugar until it is thick enough to hold it's shape well.

Assembly
Match up the cookies into sets of 2 similar size and shape and turn one over.  Spoon or pipe the filling onto the upside down cookies covering the entire surface. I spoon all the filling into a quart size zip lock bag and cut one corner off , then all I have to do it squeeze it out to pipe it.
Place the other cookie on top of the filling and press down slightly to get the filling all the way out to the edge. Repeat for each whoopie pie. 

Storage 
Please store these in the refrigerator. You can store these for up to a week in the refrigerator. Take out and let sit at room temperature for about 15-20 mins before serving to soften up or just eat them cold.
Pumpkin Spiced Whoopie Pies with Maple Mascarpone Filling from Fact Woman and Buttercream Lane blogs

Thursday, August 29, 2013

Greek Yogurt Panna Cotta with Almond Coconut Milk and Fresh Peaches that's Gluten Free!

Greek Yogurt Panna Cotta with Fresh Peaches that's Gluten Free from Buttercream Lane and Fact Woman
Panna Cotta is one of those desserts that sounds much harder to make than it is. Once I discovered how easy it was to make, I make it often. It really only takes about 4-5 minutes to whip together and then an hour or so to chill. I came up with this recipe when I wanted something a little different that I could make for a dessert but also eat for breakfast and not feel guilty! I used a combination of Nonfat Greek yogurt and almond coconut milk as the base. It turned out thick and rich and delicious and guilt free.

I feel so blessed to live in Colorado, especially during the summer peach season. This year, because of a late freeze, the peaches are harder to get than a good night's sleep but when you can get your hands on them, it's worth the effort. They're the kind of peaches that when you cut or bite into them, the juice just flows out and the perfumed scent fills the room. They are so sweet and so delicious! Just writing about them is making me want to go cut another one but I have to pace myself so I can extend this batch of them. I decided to chop some up to put into this batch and I was not disappointed. If you don't like peaches you can use almost any fruit except fresh pineapple or fresh papaya- their enzymes will prevent the mix from setting up. 


Greek Yogurt Panna Cotta with Fresh Peaches from Buttercream Lane and Fact Woman

You can make it in small jars like I did and just eat it out of the jar, or you can make it in small ramekins that you can un-mold onto a plate. You can also make it in a regular 8-9" round cake pan and un-mold that onto a large plate to serve. I just like eating it out of my cute Weck jars plus I didn't feel like un-molding anything!  If you want to un-mold it- Lightly grease the inside of your pans/ ramekins so that the panna cotta will come out easier. I also get a bowl of hot water and hold the mold in the water for a few seconds to loosen it before un-molding.

 Greek Yogurt Panna Cotta  Makes 5-6  medium servings


 Ingredients:

  • 1 envelope of unflavored gelatin 
  • 1 cup of Almond or Coconut or  The Blue Diamond Almond Coconut Milk. (you can use unsweetened or sweetened it doesn't matter. but if you use unsweetened, you might cut back on the agave or sugar) 
  • 1/4 cup agave syrup or honey or 1/3 cup sugar
  • 1- 17 oz container of Plain Greek Yogurt- nonfat, 1 %, whole milk- doesn't matter
  • 1 tsp vanilla- optional
  • 2 large or 3 medium peaches chopped- Optional You can also use strawberries, blueberries, blackberries or apricots. Any fruit but fresh Pineapple or papaya- they have enzymes in them that will prevent the gelatin from setting up so you'll end up with a yogurt and fruit drink! 

Instructions:


  1. Take a 1/4 cup of the almond milk  in a small bowl and sprinkle the gelatin over the top. Let sit 1-2 minutes while you get the rest of the ingredients together and chop up the peach. 
    1. Greek Yogurt Panne Cotta from Buttercream Lane and Fact Woman Blogs
  2. Add the yogurt  and 1/4 of the almond milk to a small bowl- (preferably one with a spout to pour out of) and whisk together until smooth. 
  3. Take 1/2 cup of the almond milk and the sweetener and place in a small saucepan 
  4. Over Medium heat, heat the milk and sweetener until mixed together and all dissolved. 
  5. Add the softened gelatin to the pan and stir until the gelatin is dissolved. You don't have to bring it to a boil. Heat just until everything is dissolved. 
  6. Remove from the heat and pour the warm mixture into the yogurt.
  7. Add the vanilla to  it if you wish. I think real vanilla tastes like plastic and the fake stuff is worse!
  8. Pour the mixture into your containers- filling 1/2 way. 
  9. If you are adding fruit, add the chopped fruit and push the fruit down into the yogurt mixture with a spoon. Then top with the remaining yogurt mixture  so that the fruit is covered. 
  10.  Greek Yogurt Panne Cotta from Buttercream Lane and Fact Woman Blogs Greek Yogurt Panne Cotta from Buttercream Lane and Fact Woman  Greek Yogurt Panne Cotta from Buttercream Lane and Fact Woman Blogs
  11. Chill for 1-3 hours depending on the shape of your container. a thinner layer will chill in an hour. A 5 oz jar will take closer to 3 hours. 
                               Greek Yogurt Panne Cotta from Buttercream Lane and Fact Woman
The panna cotta  will still jiggle a bit but not be  set up. Think a little less gigglier than jello. It's really a softer jello consistency. 

Greek Yogurt Panna Cotta with Fresh Peaches from Buttercream Lane and Fact Woman


Tuesday, August 27, 2013

Sister Wives' Caramel Recipe from Kody's Mom on The Christmas Surprise Episode

Ok, I'll admit it... I love reality TV and I actually like watching Sister Wives on TLC. I don't know if it's the fact that I'm so intrigued by their lifestyle of that I do like each of them. The whole plural marriage thing is a bit much for me to take in but they love each other and they love God so who am I to cast the first stone. On the episode last week they showed a caramel cook off and I really wanted to get the recipe. Well low and behold right there at minute 38 on the tivo, they showed the recipe sitting on the counter for a split second. Thanks to freeze frame, I copied the recipe and was very thankful for the hand written notes on it.

Caramel recipe from Sister Wives
   
Here's the recipe:  

Kody's mom-Reva’s Caramels from Sister Wives 

Ingredients:

  • 1/2 pound butter 
  • 2 cups light Karo Syrup 
  • 2 cups sugar 
  • 1/4 tsp salt 
  • 1 can of Evaporated Milk- 12 oz. size
  • 1 tsp vanilla
  • Optional- 1 cup of chopped nuts

Instructions:

  1. Add the first 3 ingredients- (Butter, Karo and Sugar) into a large pan, bring to a boil  over medium to medium high heat until all sugar is dissolved and it's golden brown.°
  2.  Add 1 can of evaporated milk slowly- so mixture doesn’t stop boiling. 
  3. Continue to boil to firm ball stage 250°  
    1. For every 500 feet over sea level, decrease temp by 1 degree. So for my house at 6000 feet- I have to decrease the temp by 12° -my final temp would be between 233° - 238°)
    2. Use this rule for any kind of candy or fudge that you make. If you live at altitude and wondered why your candy wasn't turning out this is the key!!!! 
  4.  Remove from heat and carefully add 1 tsp of vanilla  and if you like nuts, add 1 cup of chipped nuts- optional.  
  5. Place in well buttered pan and cool 
  6. Once it's all cooled, cut  into small squares and wrap in waxed paper.

Thursday, August 08, 2013

Fluffy No Bake Peanut Butter Pie with a Chocolate Lined Crust!

Fluffy No Bake Peanut Butter Pie from fact Womand and Buttercream Lane

We love to go to a very small town cafe about a half an hour away for their pan fried chicken, cooked to order, and their homemade pies. 

The Castle Cafe always has a killer banana cream pie but every few months the chef will get in a mood to make a Chocolate Peanut Butter Pie that is one of the best things I've ever had and I'm not even a big peanut butter person. Note the "only every few months" part of that- it's not nearly often enough so, I had to play with some recipes to come up with one that tastes just like his!!! We all agree that this is a perfect copy!

One of the secrets to his great pies is his chocolate coated graham cracker crusts. He uses it for his Banana Cream Pie and his Peanut Butter Pie. Brilliant! The crust never get's soggy!!  I hope you enjoy this pie as much as we do!


For a Printable Version of this recipe- Click Here! 

Ingredients

Pie Crust- Makes one 9" pie crust- You can also just buy one!!! 

  • 1 package from a box of graham crackers- about 10 sheets of crackers
  • 1/3 cup of sugar
  • 1/3 cup of melted butter
  • 3/4 of a cup of chocolate chips

Peanut Butter Filling

  • 1 1/2  8oz packages of low fat cream cheese at room temperature(12 oz)
  • 1 1/2 cups of creamy peanut butter- store bought not the fresh kind. I like Jif
  • 3 TBS of water or milk
  • 1 1/2  cup of powdered sugar- divided into 1 cup and 1/2 cup
  • 1 1/2 cups of heavy whipping cream
  • 1/2 cup of chocolate chips- Optional- you can mix some into the filling or you can just top the pie with some or both. 

Topping

  • 1/2 cup whipping cream
  • 1/4 cup powdered sugar
  • 1/2 cup of mini chocolate chips- Optional
Peanut Butter Pie from Fact Woman & Buttercream Lane

Instructions 

Pie Crust

  1. Preheat your oven to 375º
  2. While the crackers are still wrapped, press of the sides, top and bottom to start to break them up. 
  3. Place the crackers into a food processor. You can also put everything into a large zip lock bag and crush and mix the ingredients in the bag. 
  4. Add the sugar
  5. Pulse until the crackers are a fine crumb
  6. Pour the melted butter over the crumbs and pulse until all combined. 
  7. Press the crumbs into the bottom of a 9" pie plate. I use a measuring cup to press it in nice and tightly. 
  8. Bake for 7 minutes
  9. As soon as you take the crust out of the oven, sprinkle the chocolate chips over the bottom of the crust. 
  10. Let it sit for 5 minutes until the chocolate chips are melted. 
  11. With the back of a spoon, spread the melted chocolate over the bottom and up the sides of the crust. 
  12. Place in the refrigerator until cool 

Peanut Butter Filling

  1. In a  mixing bowl, beat the whipped cream with 1/2 cup of the powdered sugar until it forms stiff peaks. That means when the beaters are pulled up out of the whipped cream, the points stand up straight. 
  2. In another mixing bowl, place your 12 oz of softened cream cheese, the 1 1/2 cups of peanut butter, 1 cup of powdered sugar and 3 TBS of water. Beat until well combined and slightly fluffy. 

  3. Take 1/3 of the whipped cream and stir it into the peanut butter mixture to lighten it. 
  4. Take the remaining whipped cream and fold it into the peanut butter mixture and fold until all combined. 
  5. Spoon the peanut butter filling into the chilled crust and place in the fridge for at least 2 hours. 

Topping:

  1. In a  mixing bowl, beat the whipped cream with 1/2 cup of the powdered sugar until it forms stiff peaks. That means when the beaters are pulled up out of the whipped cream, the points stand up straight. 
  2. Spread the whipped cream over the top of the pie and sprinkle on the  mini chocolate chips. 
  Note: You can beat all 2 cups of whipped cream and the 3/4 cup of powdered sugar together- just remember to pull out a quarter of it to top the pie with before mixing the whipped cream into the peanut butter mixture. It's up to you! I tend to forget the pull out the topping so I beat the cream in separate batches! 
Peanut Butter Pie from Fact Woman & Buttercream Lane

Monday, August 05, 2013

Easy, Moist Shortcake or Vanilla Cake for Berries- made all in one bowl!!!

Strawberry Shortcake from Fact Woman & Buttercream Lane
 I'm not a fan of the dry, crumbly, biscuit style of shortcake. I want a moist tender cake for my berries.  Tender and moist but can stand up to the weight of a ton of berries and whipped cream.

16 years ago, we ordered the strawberry shortcake at a restaurant that sounds like The Black Eyed "Bee" and I was in heaven. It was the perfect cake for berries. I had to have the recipe and with a bit of flattery and begging, the chef shared the recipe with me. The one catch was, he had to leave one ingredient out to give it to me. Thankfully, he made it easy when he told me that it was a vanilla cake and guess what ingredient was missing?
We always have this on Easter to usher in berry season and is one of our favorite spring and summer treats.  It's so fast and easy to mix up and bake. I hope you enjoy it as much as we do. It's delicious with any kind of summer fruit. peaches, berries or just by itself with some whipped cream as the icing. Because my granddaughter is very allergic to eggs, this eggless cake has now become her birthday cake recipe.
Moist Vanilla Strawberry Shortcake

DSC_9473.jpg
Makes one 9x13 pan or 12 cupcakes or one jellyroll pan
Ingredients
  • 3 cups of flour
  • 2 cups of sugar
  • 1 1/2 TBS baking powder
  • 1 cup melted butter
  • 2 cups milk
  • 1 1/2 tsp vanilla

Instructions
  1. Preheat oven to 350°
  2. In a 2 cup glass measuring cup or a microwavable container- microwave 1 cup of butter for 60 seconds or until melted. I leave the sticks in the wax paper and micriwave it that way. No spatters and you just have to pull them out when it's melted. Easy and no mess. 
  3. In a large bowl stir together the flour, sugar and baking powder
  4. Stir in the milk and vanilla then the melted butter and mix well. There may be a few small lumps but just leave them. Don't over stir! 
  5. Pour batter into a greased pan and bake in the preheated oven until golden on top and a toothpick comes out clean. 
  6. Baking Times: 
    1. For a 9x13 or cupcakes-  25 to 30 minutes  
    2. For jelly roll pan- or 20 mins f. 
    Strawberry Shortcake from Fact Woman & Buttercream Lane
For a large half sheet pan 2”x13”x18”- Double the recipe and bake for 40 to 45 minutes. 

Friday, June 28, 2013

Easy Zen Tomato Tarts


Zen Tomato Tarts


In the summer tomatoes are so delicious. Juicy, sweet and filled with flavor.  I grabbed some at the farmer's market last week and wanted to use them up by making these Tomato Tarts. I made 3 tarts; one with goat cheese, one with parmesian and one with some white cheddar. The thing that makes these so special is the seasoning. This month our challenge from the   The Fennel Friday Cooking Club (hosted is by The Pollen Ranch and Kimberly, at The Hungry Goddess.)  was to make a vegetable dish using The Pollen Ranch's Zen-Sational Seasoning Blend as an ingredient. We all post our recipes to the Fennel Friday group to share our recipes.  Head on over to check out the other delicious thing we all came up with!
These take about 10 minutes to make (not including the thawing time for the puff pastry and are baked and ready to eat in 30 minutes.  

These are perfect with a salad for a lunch or a light dinner or sliced up into small pieces as an appetizer. You can make them up to 2 hours ahead of when you want to serve them. They are just as good at room temperature as they are warm. 


Ingredients
  • 1 sheet of puff pastry- thawed
  • 3 large tomatoes. I used Roma
  • 1 tsp of Zen-Sational Seasoning blend
  • 2 tbs basil chopped of chiffonaded ( fancy way of saying cut into thin little strips) I use scissors!
  • 1/2 cup of the cheese or cheeses of your choice. 
  • Olive oil
Instructions
  1. Preheat the oven to 425º
  2. Unroll the puff pastry sheet and cut into 3 strips
  3. Place the strips onto a parchment lined or greased cookie sheet
  4. With a sharp knife, cut just into the top part of the puff pastry all the way around leaving about 1/3 of an inch between the score line and the edges

  5. Tomato Tart from fact woman & buttercream lane Zen Tomato Tarts From Fact Woman & Buttercream Lane
  6. With a fork, prick holes all over the center of sheet staying inside the score lines- this keeps the center part from puffing up while allowing the edges to rise up
  7. Brush the center with some olive oil
  8. Slice the tomatoes up into thin slices and chop up the basil
  9. Arrange the basil pieces evenly over the pastry

  10. Zen Tomato Tarts From Fact Woman & Buttercream Lane Zen Tomato Tarts From Fact Woman & Buttercream Lane
  11. Sprinkle each strip evenly with 1/3-1/2 tsp of Zen-Sational Seasoning
  12. Arrange the tomatoes in a line down the middle
  13. Top the tomatoes with 2-3 TBS of the cheese of your choice.
  14. Place them into the oven and bake for 20-25 minutes until the pastry is golden brown and the cheese is melted.
Serve these warm or at room temperature.  
    Zen Tomato Tarts From Fact Woman & Buttercream Lane


The Zen-Sational blend is made up of Pollen Ranch Fennel Pollen, Sumac, Sesame Seeds, Orange Peel, Ginger, Fleur de Sel (Sea Salt), Yellow Curry, Savory Leaf,  and Cayenne. It is not hot but adds a lovely earthy warmth to the tomatoes!  It's a perfect blend!

Tuesday, June 25, 2013

10 Minute Summer Pasta for a Fast & Easy Dinner.

In the summer I don't really feel like cooking.  I just want a fast and easy dinner recipe that's healthy and not too heavy. This dish fits the bill. It takes only 10 minutes to prepare - 20 if you count waiting for the water to boil. It's filled with colorful tomatoes, basil, arugula, spinach, garlic and feta and only gets one pot dirty. You don't even cook the sauce! You throw all the "sauce" ingredients into a bowl then add the hot pasta. The heat from the pasta warms up the tomatoes, basil and greens perfectly.  Enjoy this delicious dish warm for dinner tonight and chilled for lunch tomorrow.
10 Minute Summer Pasta for a Fast and Easy Dinner
Ingredients

  • 1 pound of campanella, penne or any shape pasta you'd like. 
  • 6 large roma tomatoes or 4 large regular tomatoes
  • 2-3 cloves of garlic crushed and minced
  • 1/3 cup chopped basil leaves or 1 TBS of  Gourmet Garden Basil.
  • 2 cups of super greens or spinach and or arugula
  • 1/2 cup feta cheese
  • 3 TBS extra virgin olive oil
  • 1- 1 1/2 tsp of salt to taste
  • 1/2 tsp ground black pepper
  • 1/2 tsp of oregano or italian herb blend


  • 1 TBS kosher salt for the pasta water

    1. Bring 4 quarts of water to a full  boil with 1 TBS kosher salt or 1 1/2 tsp regular salt in the water
    2. Add Pasta to the water and cook for the recommended time until al dente 
    3. While the pasta cooks- Cut up the tomatoes into bite size pieces and place into a large serving bowl. Leave room to toss it all together- unlike the one in my picture!
    4. Add the chopped basil and the greens to the bowl
    5. Add the feta to the bowl
    6. 10 Minute Summer Pasta- Fast and Easy
    7. In another small bowl - or you can just dump it on top of the pasta. 
    8. Mix the olive oil, minced garlic, 1 tsp salt, pepper and herbs together. 
    9. Once the pasta is cooked, drain and add it to the bowl right on top of the tomatoes, greens and feta.

    10. 10 Minute Summer Pasta Fast and Easy
    11. Pour the oil blend on top and toss to combine. 
    12. Serve with some warm bread and you're already done! 
    02a72b38-3d26-4fd7-a6be-c48326ac8b40

    Wednesday, June 19, 2013

    Sour Cream Potato Salad, Mayonnaise Free, with the taste of a baked potato!

    Potato Salad is a classic, American, summertime favorite. There's just one problem with it, it has tons of mayonnaise and gotta say, I'm not a fan and neither are most of my kids. As I was topping baked potatoes the other day it struck me that I could use sour cream instead of the mayo to make a potato salad with. I'm sure people have been doing this for years and years and it's nothing new but it was new to me. That wonderful taste of a baked potato in a salad! What more could I want? Nothing! Plus, the light sour cream I use (Daisy) has half the calories and a quarter of the fat that mayo has which is a bonus in my book!  Since I was going with the whole baked potato idea I combined some of the flavors of regular potato salad and the flavors of a baked potato and this is what I came up with.

    Sour Cream Potato Salad
    Note: Some people may like a super slimy creamy potato salad- if you're one of those people, double the dressing recipe for the same 2 pounds of potatoes to get that effect. We don't like it very creamy but you can make it any way you want. Some people also may want to add 2 chopped up hard boiled eggs to this recipe, if you're into that kind of thing, go for it.

    Sour Cream Potato Salad from buttercream lane and fact woman

    Ingredients- Makes enough for 4-6 servings
    • 2 pounds small red potatoes cut into small cubes
    • 4 sliced of bacon cooked and crumbled
    • 3 green onions (scallions) sliced very thin the white and the tender greens
    • 4-5 stalks of celery diced
    • 2 TBS chopped Dill or use 1 tsp of the  Dill- Gourmet Garden Herbs in a tube 
    • 3/4- 1 cup low fat sour cream
    • 2 TBS yellow or spicy brown prepared mustard
    • 2 TBS lemon juice or 1 TBS vinegar (optional if you don't want to use relish) I like a little acid in my salad
    • 1 tsp salt or to taste 
    • 1/4-1/2 tsp pepper to taste
    • 3 TBS pickle relish (optional) 
    Instructions


    1. Cut up the red potatoes. place in a large pan and cover with water. I usually add about a tsp of salt to the water. 
    2. Bring the potatoes to a boil over high heat, once they are boiling reduce heat to med and cook until potatoes are tender when stabbed with a fork. You don't want crunchy potatoes or mashed potatoes so  check every 5 mins. It will take about 20-30 minutes. 
    3. Pour potatoes into a colander and drain well. If you're in a hurry to serve this and want it cold, you can dump them into a bowl of ice water for 5 mins and that will chill them faster. 
    4. While the potatoes cool down or even while they cook make the dressing. 
      1. Into a small bowl add the sour cream, mustard, lemon juice/vinegar or pickle relish, salt and pepper. Stir until combined. 
      2. Cook and crumble up the bacon- Set aside
      3. Chop the green onions, celery and dill*
      4. Add the onions, celery and dill to the dressing
    5. Once the potatoes are cooled, place them into a large bowl and pour the dressing over the top. Stir until the potatoes are coated. 
    6. You can actually serve this warm or chilled. We had it both ways and it was delicious either way. If you like it chilled it will take about 3-4 hours to get it good and cold. This also allows the flavors to meld together. 
    7. Just before serving sprinkle the bacon over the top or stir it in if you're like me. 
    sour cream potato salad from buttercream lane and fact woman

    *Let me share my thoughts on Gourmet Garden Herbs. They come in a tube found by the fresh herbs at the grocery store and you store them in your refrigerator or freezer. Now that all my kids are gone, my husband and I can't use up a ton of fresh herbs before they go bad. It's reality. Even when my kids were all at home, I had trouble using herbs up sometimes or I'd need herbs for a recipe and wouldn't have them. I wish I'd had these. My daughter, Laura, introduced them to me. I now always have the Garlic, Basil and Dill on hand. They last about 3 months in the fridge but I do use them up faster than that. Plus bonus they don't smell up the refrigerator. They are easy and delicious, just squeeze and stir them in!  They have no idea I'm talking about their product but I really do like them. Do I still buy fresh herbs- yes for some things but for everyday cooking these are so easy and taste so good! I love that!

    Wednesday, June 05, 2013

    Summer Grilled Corn Salad with Feta

    Summer Grilled Corn Salad with Feta
    Fresh Corn is one of my favorite things during the summer. The crisp snap as you bite into the sweet kernels just makes me happy.  There's nothing like it. I always make at least 4 extra ears of corn when we have it and hope that there are leftovers. I use the leftover corn to make corn fritters for breakfast or to make a summer salad like this. Cook once and get two meals out of it is my summer montra.

    Summer Grilled Corn Salad with Feta

    When we grill, I always grill some extra vegetables or meat for another meal. Grill while the grill is hot!! Last week I grilled stuff for that dinner, fennel for a pizza I wanted to make and some extra vegetables for this salad.


    In addition to the grilled corn for this salad, I added some grilled zucchini and some cherry tomatoes. I had some feta so I threw some of that in and topped it all off with a light vinaigrette. It would have been great with some blue cheese crumbles instead of the feta  and with some fresh basil chopped up but I was out!

    Ingredients

    Salad

    • The kernels cut off of 4- 6 ears of grilled or cooked corn
    • 1 zucchini cooked and cut up into small pieces
    • 3/4 cup of cherry tomatoes 
    • 1/4 cup of chopped basil leaves- Optional
    • 1/3 cup of crumbled feta or blue cheese

    Dressing- This dressing is a play on my good friend Kathy's. She makes this dressing with 2 TBS sugar for spinach and strawberry salad and it's delicious. I cut the sweetness for this corn salad but it is a great salad dressing recipe! 

    • 1/4 cup olive oil
    • 2 TBS balsamic vinegar
    • 1/2 tsp salt
    • 1/2 tsp ground black pepper
    • 1 dash of hot sauce- like Cholula
    • 2 teaspoons sugar   

     Whisk all ingredients together and pour over the salad. This can be done ahead of time to allow the flavors to meld together.
    Summer Grilled Corn Salad with Feta

    Friday, May 31, 2013

    Fennel and Chicken Pesto Pizza with Fennel Pollen

    Fennel and Chicken Pizza with Fennel Pollen from Buttercream Lane and Fact Woman
    I recently joined a food blogger group called  The Fennel Friday Cooking Club hosted by The Pollen Ranch and Kimberly, at The Hungry Goddess.   Each month we are given a theme challenge to make something using one of The Pollen Ranch's delicious products. This month's theme was flatbreads or pizzas using Fennel Pollen as an ingredient.  We all post our recipes to the Fennel Friday group to share our recipes.  Head on over to check out the other recipes.

    Fennel pollen I've never used Fennel Pollen before and was excited to receive the complimentary sample from The Pollen Ranch to use in my recipe. As soon as I opened the tin, I was surrounded by the scent of fennel. The fennel pollen adds a subtle fennel flavor to whatever you use it on. It's just a bit sweet and has tons of unique flavor to it.  It will be a secret ingredient in many dishes now that I've tried it.  In addition to this pizza, I used some in a batch of brown rice and it was delicious. I'll be using it in lots of dishes. I'm also thrilled that it's an organic product!


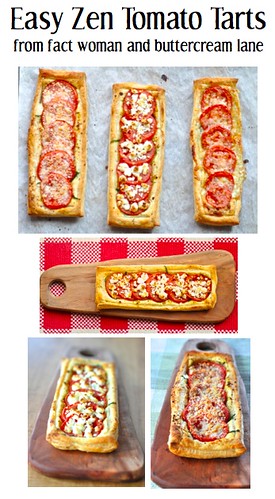
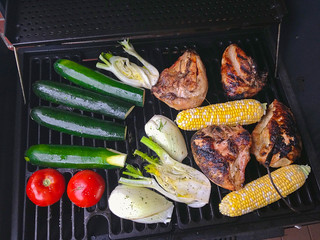
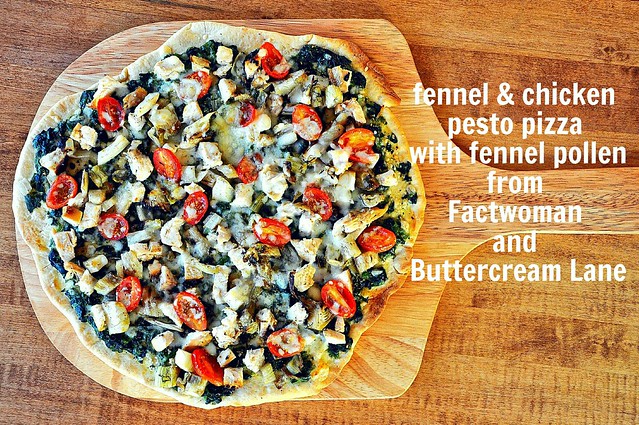
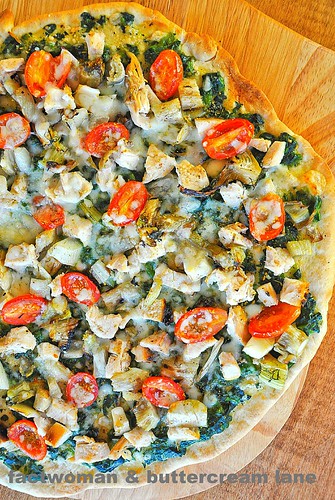
    I decided to make a fennel and chicken pesto pizza for this challenge! Last weekend we fired up the grill for Memorial day and grilled up a ton of chicken and vegetables. We had chicken, corn, zucchini and potatoes. While the grill was hot, I threw on a sliced fennel bulb to use for this pizza.   You can use any vegetables you like on it but I decided to just use the grilled fennel, grilled chicken and a few sliced cherry tomatoes for some color.  I hope you enjoy it.

     Pizza Dough 

    You can also buy store bought but here's the recipe that I use.
    • 3 cups all purpose flour
    • 1 tsp salt
    • 1 Tablespoon sugar
    • 3 TBS olive oil
    • 1 cup of warm water (110º F-  45º C)
    Combine flour, salt, sugar, and yeast into a large bowl.
    Add in the oil and the water.
    Mix well until it forms a ball.
    Knead for 5-7 minutes then let rest covered for 10 minutes. If you have the time you can let it rise until it doubles in size before rolling out but if you don't have that time you don't have to.
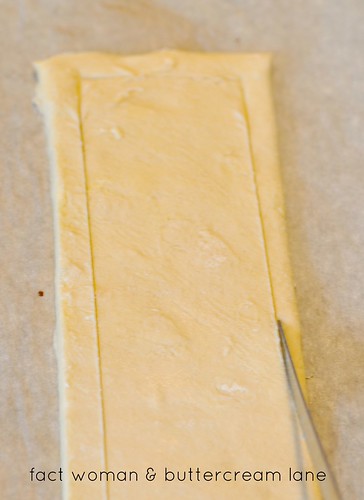
    Roll flat  or press into a pizza pan.
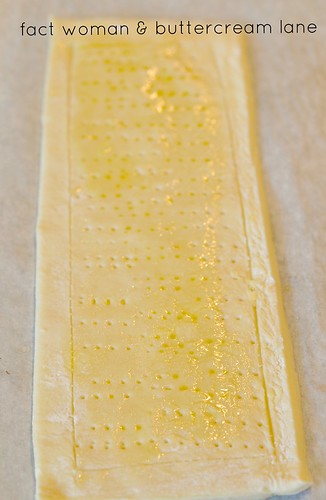
    Bake at  450º for 5 minutes then remove from oven and add toppings.
    Fennel and Chicken Pizza with Fennel Pollen from Buttercream Lane and Factwoman

    Sauce and Toppings

    Sauce:
     You can use anything you like. Olive Oil and garlic, a red pizza sauce, marinara or make a simple pesto sauce of:

    •  2 cups of fresh raw spinach
    • 1/2 cup fresh basil leaves
    • 2 cloves of chopped garlic or 1/4 tsp garlic powder
    • 3 TBS olive oil
    • 1/4 cup parmesan cheese
     Throw all these ingredients into a the blender or food processor and pulse until ingredients are blended and slightly chunky to make a simple pesto sauce. Add salt to taste if the cheese doesn't make it salty enough for you.  If it's too thick you can add a bit of water or more olive oil to thin it out a bit.

    Spread the sauce over the partially baked crust.


    Toppings:
    Scatter the remaining toppings evenly over the pizza.
    • 1 cup chopped chicken breast
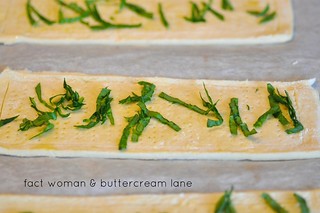
    • 1/2 a grilled fennel bulb, chopped. You can slice the bulb and grill it on a grill with some olive oil or just chop it and saute it in a bit of olive oil for 5-7 minutes until it's softened and slightly browned. 
    • 1/2- 3/4 of a tsp of fennel pollen 
    • 1/2 cup of cherry tomatoes or any tomatoes sliced thinly
    • 1/2 cup of parmesan cheese.  You can also add as much mozzarella or other cheeses as you'd like. I'm lactose intolerant so I only use a bit of parm. 
    Return the pizza to the hot oven and bake for another 7-10 minutes until crust is golden brown and the cheese is melted.

    Don't forget to head over to the Fennel Friday group  to see what everyone else came up with!!!
    Fennel and Chicken Pizza with Fennel Pollen from Buttercream Lane and Factwoman

    Saturday, April 27, 2013

    Sweet and Spicy Nuts for Salads or to Nibble on with a Cocktail!

    Sweet and Spicy Nuts from Buttercream Lane and Factwoman-3.jpg
    After 4 straight weeks of snow and cold weather, this weekend was gorgeous. In the 70's and perfect weather to enjoy drinks on the deck. I made some of these nuts to go on top of a kale and spinach salad yesterday. As I was mixing us up a couple of Old Fashioneds, I thought we needed a little nibble to go with our drinks so I pulled these out. They were delicious!
    These nuts are the perfect thing to throw together for unexpected company. They take under 5 minutes to make and are delicious.  This recipe is so versatile and can be used with any kind of nut and any kind of herbs to create many different results.

    INGREDIENTS
    • 1 tablespoon butter   
    • 2 teaspoons of brown sugar   
    • 1 cup pecan halves- or any kid of nuts you want 
    • 1/4 tsp salt
    • 1/2 teaspoon cayenne
    • 1-2 teaspoons of rosemary, thyme or any other spices that you like.  They are delicious with cumin and some chili pepper for a mexican flair or how about some oregano and rosemary for Italian night.  (optional) 

    INSTRUCTIONS
    1.  In a frying pan, over medium heat, add the butter and sugar, stir until butter is melted.  
    2. Add the pecans and continue to stir until pecans begin to get golden brown and toasted about 1 minute. 
    3. Add the cayenne and any other herbs you'd like and stir for an additional 15 seconds. 
    4. Remove from heat and let the nuts cool. 
    5. These are great on a salad or with drinks before dinner.

    Sweet and Spicy Nuts from Buttercream Lane and Factwoman.jpg

    Sweet and Spicy Nuts from Buttercream Lane and Factwoman-3.jpg
    Blogging tips