Showing posts with label Holiday Baking. Show all posts

Saturday, December 24, 2011

Candy Cane Kiss Blossoms with a Chocolate Star!

I found this great recipe on Pintrest and just had to try it. It looks so festive and I love peppermint so it was a great recipe to try. I combined parts of the original recipe from Recipe Girl and parts of the Hershey's Candy Cane Blossom cookie recipe to make these.


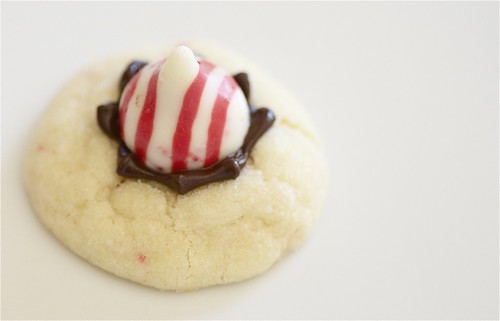
As I was taking the first batch out of the oven I had to move the bag of Brach's dark chocolate stars, from making peanut butter blossoms, out of the way and inspiration hit me. Why not put both the chocolate star and the kiss on top?

Candy Cane Kiss Blossoms

Yield: 2 1/2 dozen cookies
Prep Time: 30 min
Cook Time: 12 min
When the fall holidays arrive, the Candy Cane Kisses begin to appear on supermarket shelves too. These are an incredibly delicious flavor delivered by the Hershey’s Kisses people. And they’re amazing tucked into a cookie too.

Ingredients:

1 1/2 cups powdered sugar
1 1/4 cups butter, at room temperature
1/2  teaspoon peppermint extract
1 teaspoon vanilla extract
1 large egg
2 3/4 cups all-purpose flour
1 teaspoon baking powder
1/2 teaspoon salt
1/2 cup Candy Cane flavored Hershey's Kisses, finely chopped
granulated sugar
additional, unwrapped Candy Cane Kisses- about 60
Chocolate stars- about 60

Directions:

  1. Preheat oven to 350°F. Make room in either refrigerator or freezer for your cookie sheet. Or you can do what I do which is to just let them sit out for an hour and they'll set up.
  2. In large mixer bowl, combine powdered sugar, butter, extracts and egg. Beat at medium speed, scraping bowl often until creamy (2-3 minutes). 
  3. In a separate bowl, whisk together flour, baking powder and salt. Add to wet mixture and beat, scraping bowl until just blended.  Stir in chopped Kisses.
  4. Shape dough into 3/4-inch to 1-inch balls; roll in granulated sugar. Place 1-inch apart on cookie sheet. Bake for 10-12 minutes or until set.
  5. As soon as they come out of the oven, press a chocolate star  point side down in the center of each cookie. They'll crack a little around the edges, so just use your fingers to kind of hold the cookie together while you press the chocolate on.  Do all the cookies on the tray then go back and place a kiss on top of the chocolate star pressing down until the chocolate squeezes out from under the kiss forming a flower around it.


 You can leave the cookies out to set up or put cookie sheet (with cookies) immediately into the freezer (preferred) or refrigerator so that the Kisses will set quickly. Store in a covered container- at room temperature for up to a week. In the freezer they should be ok for a couple of weeks.

Thursday, December 22, 2011

Peppermint Meringues


If you make the spritz cookies I have posted here, then you will have 3 lovely egg whites leftover which is what you need to make these meringues. My mother in law taught me to make them when she taught me to make the spritz cookies. They are the perfect cookie pair.
3 egg whites
1/8 teaspoon salt
1/4 teaspoon cream of tartar
3/4 cup white sugar
3 peppermint candy canes, crushed up finely
1-2 drops of red food coloring- optional
  1. Preheat oven to 225 degrees F (110 degrees C).
  2. Line 3 cookie sheets with parchment paper or a brown paper bag.
  3. Let your egg whites come to room temperature before you beat.
  4. In a large spotlessly clean mixing bowl (if there is any fat residue in the bowl the egg whites won't ever beat up into peaks) place your egg whites, salt and cream of tartar.
  5. Beat egg whites, salt, and cream of tartar to soft peaks. When you pull your beater out the top will fold over.
  6. Gradually add sugar, while continuing to beat until whites form stiff peaks. When you pull the beater out the peak will stand straight up.
  7. Fold the crushed candy canes and the drop of red food coloring into the egg whites, gently.
  8. Take a gallon Zip Lock bag and cut the corner off. The opening should be about 1/2 wide. 
  9. Spoon the meringue batter into the bag and squeeze out the batter onto the paper lined sheets. You can also slip a LARGE star tip into the corner of the bag for slightly more decorative cookies. It has to be one with a large opening or the chunks of candy cane get stuck. There's always one piece that clogs it up. In this picture the one on the left was just a plain plastic bag and the one on the right was with a star tip.
  10. You can make them up to 2 inches or as small as a kiss size. They really don't spread very much at all so if you leave 1/2" between them you should be good. If the batter is a little looser then leave an inch. In the picture at the top of the page, the large one is about 2" and the small ones are about 1"
Bake for 1 hour for small and 1 1/2 hours for large in preheated oven. Rotate the sheets after half the time.  Meringues should be completely dry on the inside but don't let them brown. Turn off the oven and prop the oven door ajar a few inches with an oven mitt, and let the meringues sit in the oven until completely cool. Loosen from the paper with a spatula. Store in cool dry place for up to 2 months.

Tuesday, December 20, 2011

Peanut Butter Blossom Cookies


These cookies are chewy and peanut buttery and delicious. You can use a Hershey's chocolate kiss in the middle or a Brach's Chocolate Stars. I like the stars because they come in milk or DARK chocolate and as far as I'm concerned, the darker the better when it comes to chocolate. We love these not only at  Christmas but any time of the year.
Ingredients
• 48 Hersheys' Kisses or Brach's Chocolate Stars
• 1/2 cup butter
• 3/4 cup Creamy Peanut Butter
• 1 cup packed light brown sugar
• 1 egg
• 2 tablespoons milk
• 1 teaspoon vanilla extract
• 1-3/4 cups all-purpose flour
• 1 teaspoon baking soda
• 1/2 teaspoon salt
• Granulated sugar to roll dough balls into before baking
Directions
  1. Preheat oven to 375 degrees 
  2. Beat butter and peanut butter in large bowl until well blended. 
  3. Add 1/3 cup granulated sugar and brown sugar; beat until fluffy. 
  4. Add egg, milk and vanilla; beat well. 
  5. Stir together flour, baking soda and salt; gradually beat into peanut butter mixture.
  6. Shape dough into 1-inch balls. Roll in granulated sugar and place on ungreased cookie sheet.  Do NOT put the chocolate on the cookie yet.
  7. Bake 8 to 10 minutes or until lightly browned. 
  8. Remove from oven and immediately press a chocolate into center of each cookie, the cookie will crack around edges. 
  9. Remove from cookie sheet to wire rack. 
  10. Cool completely. 
Makes About 4 dozen cookies

Thursday, November 18, 2010

Holiday Cranberry Tart- A Festive and delicious make ahead dessert.

This is a yummy recipe that I got from Bon Appetit magazine 3 years ago. The combination of the clean fresh taste of cranberries and fresh ginger, a creamy mascarpone cheese filling and the crisp chocolate cookie crust is divine.  If you don't like chocolate you can use vanilla cookies for the crust.

The best thing is that you make all of the components 2 to 3  days ahead of time and then assemble them just before serving. It's actually better when the cranberry part sits for a few days, but if you want to do it all the day of you can.


Cranberry Chocolate Tart 
Bon Appetit Nov. 2007

Click here for a printable version of this recipe
Cranberry Topping:
1/2 cup cranberry juice, divided
1 teaspoon unflavored gelatin
1- 12-ounce bag fresh or frozen cranberries
3/4 cup sugar
2 teaspoons fresh lemon juice
1 teaspoon finely grated lemon peel
1 teaspoon grated peeled fresh ginger
Pinch of salt
4 tablespoons finely chopped crystallized ginger

Crust:
1 1/4 cups chocolate wafer cookie crumbs (made from about 6 1/2 ounces cookies, finely ground in processor) You may also use vanilla wafer cookies or shortbread cookies instead.
1/4 cup sugar
1/8 teaspoon salt
5 to 6 tablespoons unsalted butter, melted

Mascarpone Filling:
1- 8-ounce container mascarpone cheese- an Italian cream cheese you can find at most stores now
1/2 cup powdered sugar
1/2 cup chilled whipping cream
1 teaspoon vanilla extract
Thin strips of crystallized ginger (optional garnish)

Preparation
Pour 1/4 cup cranberry juice into small bowl; sprinkle gelatin over. Let stand until softened, 15 minutes. Combine 1/4 cup cranberry juice, cranberries, and next 5 ingredients in medium saucepan; bring to boil, stirring until sugar dissolves. Reduce heat to medium; simmer until cranberries are tender but still plump, 5 minutes. Strain into bowl; set cranberries aside. Add gelatin mixture to hot juice in bowl; stir until gelatin dissolves. Stir cranberries back into juice. Chill until cranberry mixture is cold and slightly thickened, at least 8 hours or overnight. DO AHEAD: Can be made 2-3 days ahead. Cover and chill.

Stir chopped crystallized ginger into cranberry mixture one hour before assembling.

For crust:
Position rack in center of oven and preheat to 350°F. Combine chocolate (or vanilla) wafer cookie crumbs, sugar, and salt in medium bowl; add 5 tablespoons melted butter and stir until crumbs feel moist when pressed together with fingertips, adding remaining 1 tablespoon melted butter if mixture is dry. Press crumb mixture firmly onto bottom and up sides of 9-inch-diameter tart pan with removable bottom. Bake chocolate crust until beginning to set and slightly crisp, pressing with spoon if crust puffs during baking, about 14 minutes. Transfer tart pan to rack and cool crust completely before filling.

For mascarpone filling:
Using electric mixer, beat all ingredients except ginger in medium bowl just until thick enough to spread (do not overbeat or mixture may curdle). Cover and chill.

Assembling Tart: Up to 6 hours before serving
Spread mascarpone filling in crust.
Spoon cranberry mixture evenly over mascarpone filling.
Chill at least 2 hours and up to 6 hours.
Garnish with crystallized ginger strips, if desired.
Cut tart into wedges and serve cold.

Tuesday, July 06, 2010

Apple Rosemary Blue Cheese Bites

Warm apple slices wrapped with blue cheese and pecans with a hint of rosemary all wrapped up in a flaky crust. Perfect for a cocktail party or as an appetizer before a special dinner.

1- 8 oz. package of Pillsbury Crescent Rolls
2 large golden delicious apples- Peeled, cored and sliced into 8 slices each
4 oz of crumbled blue cheese
2 TBS of cream cheese- softened
½ tsp fresh or dry rosemary chopped fine
¼ cup of chopped pecans or walnuts (optional)

• Preheat your oven to 375 degrees.
• Grease a cookie sheet or line a cookie sheet with parchment paper.
• Peel, core and slice your apples
• In a small bowl stir together the blue cheese, cream cheese, nuts and rosemary until the mixture hold together.
• On a piece of parchment or plastic wrap, unroll the Pillsbury Crescent Roll dough and Divide into 8 triangles. Cut each triangle into half for 16 smaller triangles.
• Spread 1-2 teaspoons of the cheese mixture on the wide end of a triangle and wrap around an apple slice.
• Place on the prepared baking sheet
• Bake in your preheated oven for 20 to 22 minutes or until they are golden brown.

Serve warm or room temperature.
These can also be made with fresh pears instead of apples.

Wednesday, December 09, 2009

Candy Cane Cookies


-->
In 1959 the Quaker Oats Company included a small recipe booklet in their oatmeal boxes. This recipe is from that booklet with a couple of changes my mom made over the years! 
It is the one cookie that all my kids adore and everyone asks for the recipe once they taste them. It is really an oatmeal shortbread so a bit on the crumbly side and best with a cup of cocoa, tea or milk! 

Candy Cane Cookies
1 cup Butter softened
2 tsp vanilla
½ cup powdered sugar
3 Tbs Water
2 ½ cups sifted flour
¼ tsp salt
1 ½ cups oatmeal
Preheat oven to 325 degrees
Cream butter, sugar and vanilla together.
In a seperate bowl mix together the flour and salt


Once the butter, sugar and vanilla are light a fluffy, add half the flour mixture and half of the water and mix until just combined. Add the remaining flour and water and mix again just until combined then mix in the oatmeal.
The dough should not be crumbly. If it is add more water one tablespoon at a time.

I like to roll my logs out on a silicone mat so that I don't have to use extra flour but a floured counter will work
just as well.
Take a ball of dough the size of and egg and pinch it into a log shape. Then with both hands roll into a snake about 1/2 inch wide and 7 inches long


Place the log onto a baking sheet, either un-greased or with parchment on it, and form into a cane shape. You can also roll the dough into a ball and flatten with a cookie stamp or the bottom of a glass or measuring cup to make a disk.
Bake at 325 degree s until they are just slightly golden brown on the bottom, about 20 minutes.


Lay out on waxed paper to cool completely.
Make your glaze by combining 2 cups of sugar and 4 TBS of milk. The glaze should be thick enough to coat the cookies without running off.
Place the glaze in a wide bowl so that you can dip the cookies into glaze without hitting the sides of the bowl.
Dip the cooled cookies into glaze and lay out on waxed paper until the glaze is set.
Take the remaining white glaze and add a few drops of red food coloring to it. Spoon the red glaze into a quart size feeezer zip lock bag and cut a small bit off of one corner to make a piping bag to make the stripes.


I lay out all the cookies and make large sweeping stripes over all the rows at once.

You can also stripe them one at a time.
These freeze beautifully so make a double batch and stash some away .


Tuesday, December 01, 2009

Swedish Spritz Cookies


Spritz cookies are a family tradition that go all the way back to my husband's great grandmother. The original recipe called for 1/2 a teacup of sugar and and a ball of butter the size of a man's fist.

Tools: You will need something called a cookie press to make these cookies. A cookie press extrudes cookie dough through unique shaped steel disks. These disks create the shape of the cookies. Most cookie presses also come with decorating tips to use for frosting and decorating. There are 4 major kinds of cookie presses on the market. In the left hand picture from left to right; an old fashioned crank press, a top trigger press and an electric press. The right hand picture shows a regular trigger press with the disks. I would highly recommend either a regular trigger press or an electric press. I personally like the electric presses or the regular trigger presses. A good press will cost between $15- $25.
Ingredients:
1 cup of room temperature butter

2/3 cup white sugar

3 egg yolks

1 tsp almond extract

2 1/2 cups of flour

Directions:
Cream the butter and sugar until light in color and fluffy.


Add the egg yolks one at a time and beat until they are completely mixed in.

Add the flour and the almond extract. Mix just until the flour is incorporated.

Divide dough if you want to add coloring to any of it. Many people like the buttery cream color for all of their shapes. I like green trees and wreaths and red and white flowers. so I tint 1/2 the batch green and then the other half I tint 2/3 of it red and leave the other 1/3 white.

Load the dough into the cookie press. Squeeze the trigger until the dough begins to come out the bottom through the disk. Now hold the press with the disk end resting on the UNGREASED cookie sheet, making sure that the press rests on the cookie sheet Then squeeze the trigger until the dough appears at the edge of the mold. Then lift the press. To make the wreaths, I use the star disk and just press out long zig zag lines of dough on the baking sheet. I then break it into smaller pieces and form by hand into a circle. I press the 2 ends together and then place a red hot on the seam to hide it. As you can see from the photograph at the top, I am not a perfectionist when it comes to making perfect circles.


There will be a bit of trial and error to figure out how many squeezes or how long to press the button to make the perfect shape. If it is too big then scrape it off and put it into the next batch to press. Once you have the shape you want move the press over 1" and press again. One tube of dough will make about 30 cookies. It is much easier to press cookies out onto a cool cookie sheet. If the dough is too soft when using a cookie press, refrigerate the dough or add a small amount (1 to 2 tablespoons) of flour. If it is too stiff, add 1 egg yolk.

I decorate my Christmas trees with one gold or silver dragee at the top and my wreathes and my flowers with one cinnamon red hot candy before baking.
Bake at 400° for 8-9 minutes until just barely golden on the bottom.

These cookie freeze beautifully.


Wednesday, November 25, 2009

Bourbon or Rum Sauce for all your pies, cakes or anything!


This is the best sauce for any kind of pie. We eat it on apple, pecan, and pumpkin pies at Thanksgiving. It's the sauce that they serve at a restaurant called Pappadeaux's Restaurant in Houston. It is thick and creamy and not too sweet. The perfect compliment to a pie, cake or even a spoonful stirred into a cup of coffee. Happy Thanksgiving!

Bourbon Sauce

  • 1 1/2 cups of whipping cream
  • 1 cup of milk
  • 1 small box of vanilla instant pudding mix
  • 3 TBS Bourbon, whiskey, brandy or rum
  • 1 tsp of vanilla
Pour the cream into a medium mixing bowl and beat just until it starts to thicken.
Add the milk and beat to combine
Slowly beat in the instant pudding mix
Add the vanilla and liqueur and continue whipping until it is well blended and is a thick sauce consistency. It should be almost as thick as pudding and shouldn't be runny. 
Place into a sealed container and refrigerate for at least one hour before serving. It will thicken up as it sits. This can be made a day ahead as it stores very well.

Monday, November 09, 2009

Easy All Butter Pie Crust- Food Processor


 I love flaky pie crust but not the film that shortening leaves in my mouth and really, isn't everything better with lots of butter in it. This recipe can be made today and then frozen until the day before Thanksgiving. Take it out and set it in the fridge overnight and you will be already for the pie making on


  • 2 1/2 Cups all purpose flour (12 1/2 ounces), plus additional flour for work surface
  • 1/2 teaspoon table salt
  • 1 Tablespoon sugar
  • 16 tablespoons butter (2 sticks), cold, cut into 1/2-inch cubes and frozen for 10 minutes
  • 3 tablespoons sour cream (the acid in the sour cream helps make the crust tender)
  • 1/3 Cup ice water , or more if needed
Process flour, salt, and sugar together in food processor until combined, about 3 seconds. Add butter and pulse until butter is size of large peas, about ten 1-second pulses.

Using fork, mix sour cream and 1/3 cup ice water in small bowl until combined. Add half of sour cream mixture to flour mixture; pulse for three 1-second pulses. Repeat with remaining sour cream mixture. Pinch dough with fingers; if dough is floury, dry, and does not hold together, add 1 to 2 tablespoons ice water and process until dough forms large clumps and no dry flour remains, three to five 1-second pulses.

Turn dough out onto work surface. Divide dough into 2 balls and flatten each into 4-inch disk; wrap each disk in plastic and refrigerate until firm but not hard, 1 to 2 hours, before rolling.

Dough can be refrigerated for up to 24 hours. Let thoroughly chilled dough stand at room temperature for 15 minutes before rolling. Dough can also be frozen for several months. Make the pie dough, shape it into two 4-inch disks, wrap the disks tightly in a double layer of plastic wrap and foil, and freeze. When you're ready to make a pie, simply thaw the disks in the refrigerator overnight.

Holiday Biscotti

I originally saw a recipe like this in Bon Appetit and made some changes to the original recipe, I know you're shocked that I'd adapt a recipe. It is so pretty with the green and red and it's perfect for the holidays. 
2 cups all-purpose flour
1 1/2 tsp baking powder
3/4 cup sugar
1/2 cup (1 stick) butter at room temperature
1 tsp grated lemon zest
1/4 tsp salt
2 large eggs
3/4 cup pistachios, coarsely chopped
2/3 cup dried cranberries
12 ounces good-quality white chocolate, chopped
Red and green sugar crystals, for garnish
  • Preheat the oven to 350 degrees F.
  • Line a heavy large baking sheet with parchment paper. silpat, or just grease really well. 
  • Whisk the flour and baking powder in a medium bowl to blend. 
  • Using an electric mixer, beat the sugar, butter, lemon zest, and salt in a large bowl to blend. 
  • Beat in the eggs 1 at a time. 
  • Add the flour mixture and beat just until blended. 
  • Stir in the pistachios and cranberries.
Form the dough into a 13-inch long, 3-inch wide and 3/4" to 1" thick (tall) log on the prepared baking sheet. Bake until light golden, about 40 minutes. Cool for 30 minutes.

Place the log on the cutting board. Using a sharp serrated knife,(if you have an electric carving knife those work really well for this) cut the log on a diagonal into 1/2 to 3/4-inch-thick slices. Arrange the biscotti slices, cut side down, on the baking sheet. Bake the biscotti again for 10 minutes on one side then turn over and bake until they are pale golden, about 5 more minutes. Remove from oven and transfer the biscotti to a rack to cool completely.

Stir the chocolate in a bowl set over a saucepan of simmering water until the chocolate melts. Either dip half of the biscotti into the melted chocolate shake off the excess chocolate or drizzle chocolate over the top and sprinkle with the sugar crystals. Refrigerate until the chocolate is firm, about 35 minutes.

This biscotti can be made ahead. Store them in an airtight container up to a week or wrap them in foil and freeze in resealable plastic bags for up to 2 months.

Wednesday, November 19, 2008

Pumpkin Cheesecake

Just in time for Thanksgiving!

After years of trying Pumpkin cheesecake recipes, I found this one and with a few changes came up with what I think is the best recipe out there.

Depending on the oven and the temperature of the ingredients, the cheesecake may bake about 15 minutes faster or slower than the instructions indicate; it is therefore best to check the cake 1 1/4 hours into baking. Although the cheesecake can be made up to three days in advance, the crust will begin to lose its crispness after only one day. To make slicing the cheesecake easy and neat, use a knife with a narrow blade, such as a carving knife; between cuts, dip the blade into a pitcher of hot water and wipe it clean with paper towels.
Makes one 9-inch cake, serving 12 to 16

Crust
3
ounces graham crackers(5 whole crackers), broken into large pieces
3
tablespoons granulated sugar 
2
ounces pecans ,chopped (about 1/2 cup)
1/2
teaspoon ground ginger 
1/2
teaspoon ground cinnamon
1/4
teaspoon ground cloves 
4
tablespoons butter, melted

Filling
1 1/3
cups granulated sugar 
1
teaspoon ground cinnamon
1/2
teaspoon ground ginger 
1/4
teaspoon ground cloves 
1/4
teaspoon ground nutmeg 
1/4
teaspoon allspice 
1/2
teaspoon salt
1
can pumpkin (15 ounces)
1 1/2
pounds cream cheese, 3-8oz packages , cut into 1-inch chunks and left to soften at room temperature, about 30 minutes
1
teaspoon vanilla extract
5 large eggs that have been brought to room temperature
1
cup heavy cream 

Before beginning crust, dry your pumpkin- This makes the filling thicker and creamier:
  • To dry your canned pumpkin: Line baking sheet with triple layer of paper towels. Spread pumpkin on paper towels in roughly even layer. Cover pumpkin with second triple layer of paper towels and press firmly until paper towels are saturated. Peel back top layer of towels and discard. Grasp bottom towels and fold pumpkin in half; peel back towels. Repeat and flip pumpkin onto baking sheet or into an extra mixing bowl; discard towel.
1. FOR THE CRUST: Adjust oven rack to lower-middle position and heat oven to 325 degrees. Spray bottom and sides of 9-inch springform pan evenly with nonstick cooking spray. Pulse crackers, nuts, sugar, and spices in food processor until evenly and finely ground, about fifteen 2-second pulses. Transfer crumbs to medium bowl, drizzle melted butter over, and mix with rubber spatula until evenly moistened. Turn crumbs into prepared springform pan and, using hand, spread crumbs into even layer. Using flat-bottomed ramekin or drinking glass, press crumbs evenly into pan bottom, then use a soup spoon to press and smooth crumbs into edges of pan. Bake until fragrant and browned about the edges, about 15 minutes. Cool on wire rack while making filling.
  • At this point, bring about 4 quarts water to simmer in stockpot for the Bain Marie. A bain-marie is the French term for a water bath.
2. FOR THE FILLING:  Whisk sugar, spices, and salt in small bowl; set aside.

3. In standing mixer fitted with flat beater, beat cream cheese at medium speed to break up and soften slightly, about 1 minute. Scrape beater and bottom and sides of bowl well with rubber spatula. Add about one third of sugar mixture and beat at medium-low speed until combined, about 1 minute; scrape bowl and add remaining sugar in two additions, scraping bowl after each addition. Add your dried, canned pumpkin and vanilla and beat at medium speed until combined, about 45 seconds; scrape bowl. Add 3 eggs and beat at medium-low until incorporated, about 1 minute; scrape bowl. Add remaining 2 eggs and beat at medium-low until incorporated, about 45 seconds; scrape bowl. Add heavy cream and bourbon and beat at low speed until combined, about 45 seconds. Using rubber spatula, scrape bottom and sides of bowl and give final stir by hand.

4. Set springform pan with cooled crust on an 18-inch-square doubled layer heavy-duty foil and wrap bottom and sides with foil; set wrapped springform pan in roasting pan.This is to keep the water out of the springform pan while the cheesecake bakes.

Pour filling into springform pan and smooth surface; set roasting pan in oven and pour enough of your boiling water to come about halfway up side of springform pan.

Bake until center of cake is slightly wobbly when pan is shaken, and center of cake registers 145 to 150 degrees on instant-read thermometer, about 1 1/2 hours.
  • For baking at altitude. Subtract 2 degrees for each 1000 feet of altitude. For Denver, the center of the cake should register 140 degrees.
Set roasting pan on wire rack and use paring knife to loosen cake from sides of pan. Cool until water is just warm, about 45 minutes. Remove springform pan from water bath, discard foil, and set on wire rack; continue to cool until barely warm, about 3 hours. Wrap with plastic wrap and refrigerate until chilled, at least 4 hours or up to 3 days.

5. TO SERVE: Slide thin metal spatula between crust and pan bottom to loosen, then slide cake onto serving platter. Let cheesecake stand at room temperature about 30 minutes, then cut into wedges and serve.
Blogging tips